Christmas Decoration Crafts
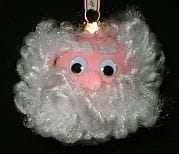
What fun it is to make your own Christmas ornaments! There is just something so special about homemade ornaments. Here’s one that is especially adorable. In my opinion, this Glass Santa ornament is as cute as they come.
Everyone gets a kick out of these wonderful Santas. Young children in particular think they are funny.
Making this glass Santa ornament involves painting the inside of a clear glass ball. This is not hard to do but it does require you to wait quite a while for the paint to dry before you can proceed with finishing the ornament. Other than that, this darling ornament is pretty quick and easy to make.
Making these handmade ornaments is a great Christmas arts and crafts idea. Here’s how to do it.
Glass Santa Ornament – Materials
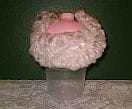
Clear glass ball ornament (For this ornament, I use the 67mm size, which is approximately 2-5/8 inches from top to bottom, not counting the cap.)
Pink Acrylic Craft Paint
Wiggle Eyes (I like self-adhesive ones.)
White Chenille Stem (“pipe cleaner”) (for Santa’s eyebrows, the small amount needed)
White “Loopy Chenille” (also known as “Curly Chenille Hank”)

- The 38mm width is good for the 67mm glass ball. If you use a larger glass ball, you may want to use wider loopy chenille.
- You will need two pieces of loopy chenille. For the 67mm size bulb, one piece will be about 4 inches, and the other about 7-1/2 inches long.
Small Pink Pompon
Ribbon
Double-sided Tape, or Glue
Empty Container (for the paint to drain into)
Glass Santa Ornament – Instructions
Remove the cap from the glass ball, and paint the inside of the glass ball.
Click this link for a detailed description of how to paint inside glass ornament balls.
When the paint is dry, proceed as follows:

Using double-sided tape or glue, attach the 4-inch piece of loopy chenille across the glass ball just under where you intend to put Santa’s nose. This piece is Santa’s mustache and the top part of his beard.
Now attach the 7-1/2 inch piece. This needs to extend from the base of the cap on one side, around the ball just under the “mustache” piece, and up to the base of the cap on the opposite side. Place it so you are not able to see any space or line between the two pieces.
If you use glue to attach the loopy chenille, allow it to dry.
Replace the ornament cap.
Glue on the wiggle eyes (or use self-adhesive)
Cut two small pieces of white pipe cleaner for the eyebrows. Tape or glue them above the eyes.
Tape or glue on the small pink pompon nose.
Tie a ribbon through the hanger wire. The knot needs to be tight enough to not come undone under the weight of the hung ornament.
Your glass Santa ornament is now complete.